Windows 95 OS holds a special place in the hearts of many that marked a shift in UI design, functionality, and accessibility. With a leap forward from its predecessors, it brought multiple features that shaped the future of personal computing for years to come.
At present, while newer versions of the OS have taken center stage, is nostalgia striking you and you want to give your PC a vintage look?
Fortunately, you can install Windows 95 virtual machine on your PC and revisit the old experience. In today’s blog, we’ll show you how to do that.
How to Install Windows 95 in a Virtual Machine
Talking about the innovation and features this OS version came with is endless. Suppose you want to explore how Windows in the earlier times worked or want to play a game or use an application that is no longer available in the current version. In that case, it can be great fun to install a Windows 95 virtual machine via VirtualBox.
1. Download the Win 95 OSR 2 ISO file and product key.
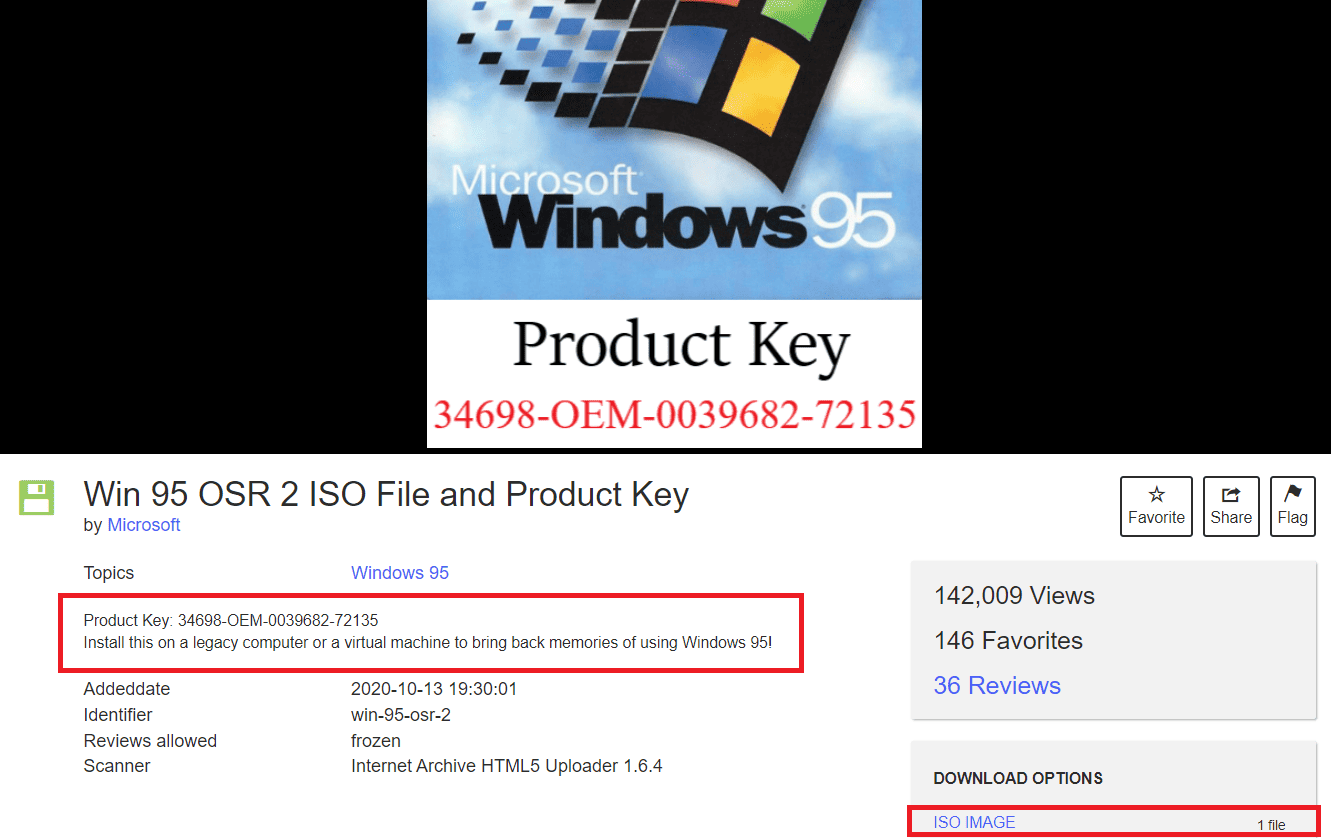
2. Although we are using VirtualBox here, you can also use any other VirtualBox alternative virtual machine program if you want.
3. Open VirtualBox on your PC, and click on the New button at the the top left corner.
5. In the Create Virtual Machine pop-up window, type Windows95 in the Name text field.
6. VirtualBox will set the memory to 64MB by default. If preferred, choose 256MB for improved performance.
7. Click on Next to create a Virtual Disk.
Note: Don’t change the default options: VDI Image, Dynamic allocation, and 2GB disk size for the Virtual disk.
8. Once the virtual machine is created, go to the homepage of VirtualBox, click on your virtual machine on the left pane, and then on the Start button.
9. Click on the Folder icon at the bottom and then click on Add to choose the start-up disk.
10. Now, select the Windows 95 ISO you downloaded earlier and then click on Choose to attach the ISO file to VirtualBox.
11. Finally, on the next window, click on the Start button and wait for the VM to boot.
12. Press the Enter key when you see the installation wizard to start the installation process.
13. Click on Configure the unallocated disk space (recommended) and then select Yes, enable large disk support.
14. Now, in the next window, enter the Windows 95 product key you downloaded – 34698-OEM-0039682-72135.
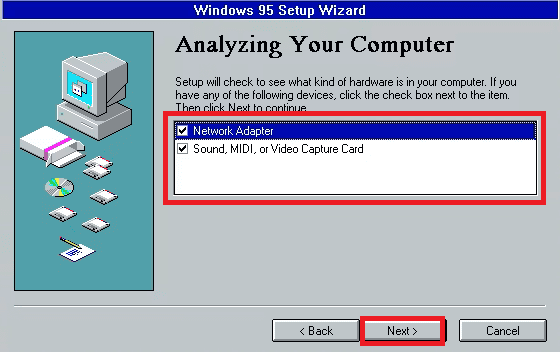
15. Check the box for Network Adapter and Sound, MIDI, or Video Capture Card, and then click on Next.
16. Select No, I do not want a start disk, and click on Next.
17. After the installation, click on the Devices, followed by Optical Drives, and then on Win95 OSR2.ISO to deselect it.
18. Lastly, click on Finish, the virtual machine will restart and you’ll have Windows 95 on it.
How to Set Up Windows 95 on Windows 11 / 10 Using Oracle VM VirtualBox 7
Oracle VM VirtualBox is another virtual machine program that you can use to install Windows 95 on your Windows 10/11 PC. Follow the steps:
Step 1: Create a New Virtual Machine
1. Download the Windows 95 ISO file, and Windows 95 Boot Disk, and also install the Oracle VM VirtualBox manager.
2. Once downloaded and installed, launch the Oracle VirtualBox and click on the New or Machine button on the top.
Note: You can also press Ctrl+N.
3. In the Name text field, type Windows95, and click on Next.
4. Select the RAM size. While the recommended memory size by default is 64 MB, you can extend it up to 512 MB if preferred. However, it is not required. So, click on Next.
5. In the Create Virtual Machine pop-up, select Create a virtual hard disk now, and click on Create.
6. Select VDI (VirtualBox Disk Image), click on Next, then select Dynamically allocated, and click on Next again.
7. Use the slider to set the hard disk size as preferred and click on Create.
For Windows 95, the recommended hard disk size should be at least 2 GB.
8. Once the VM is created, go to Windows 95 on the left panel, click on the Settings icon, and ensure the following settings:
- System > Acceleration tab: Enable VT-x/AMD-V and Nested Paging are both unchecked.
- System > Motherboard: Tick the checkbox for Optical and Hard disk in the Boot order and also for Enable I/O APIC.
- Display > Screen tab: Video Memory 128 MB
- Display > Scale Factor: 100%
- Audio > Audio Controller: Use Sound Blaster 16
- Network > Adapter 1 > Use Bridged Adapter and ensure that the Adapter Type is PCnet-Fast III
- General > Advanced > Enable Shared Clipboard and Drag n’ Drop as Bidirectional
9. Now, go the Settings once again, select Storage, and then click on Empty under Controller: Floppy.
10. Under Attributes, click on the Save icon next to Floppy Drive, and select the boot image you downloaded earlier.
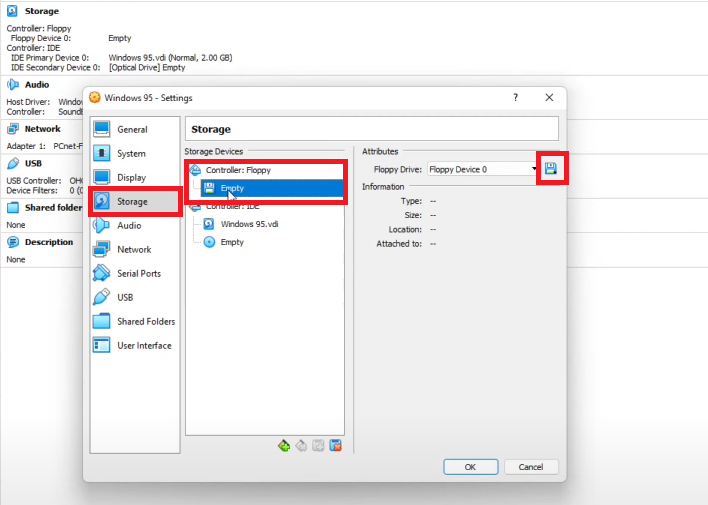
11. Click on Empty under Controller: IDE, then on the Disk icon next to Optical Drive, and select the ISO file downloaded earlier.
Step 2: Install Windows 95
12. Once done. click on Start at the top to start the virtual machine.
13. In the Microsoft Windows 95 Startup Menu, select Load NEC IDE CDROM driver and wait for it to load.
14. Type fdisk in the terminal and hit Enter. When it asks Do you wish to enable large disk support, hit Y.
15. Under FDISK Options, press 1 to choose the default option. Similarly, for Create DOS Partition, choose 1, and then hit Enter again to answer the question as Y.
16. Now, click on Machine at the top left and select Reset or press the Ctrl + R keys to reboot the VM.
17. Once it restarts, again enter 1 to choose Load NEC IDE CDROM driver.
18. In the A:/ directory in the terminal, execute the command Format C: and press Enter.
19. Press Y and then Enter to accept the warning command. Once the drive is formatted, press Enter again when it asks you to name your drive.
20. Now we need to go into the C drive and create a directory as well. So, execute the following command mkdir WIN95.
21. Type cd WIN95, press Enter, and then type copy D:\WIN95.
Note: If the drive letter at the beginning is shown as R, replace D: with R: to copy the enter WIN95 folder in the R directory.
22. Wait until the files are copied and once done, type setup next to C:\WIN95, and press Enter to execute the setup process.
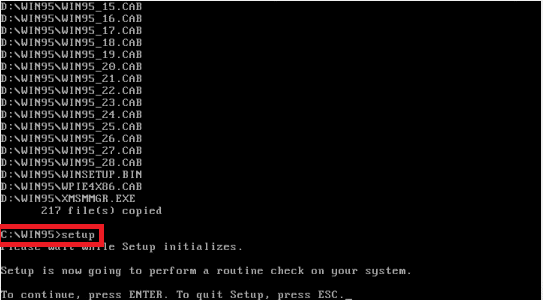
23. Click on Continue in the Windows 95 Setup popup, and then on Yes to agree to the Software License Agreement.
24. In the Setup wizard, click on Next > Next > Next, then enter the product key, and click on Next again.
25. Enter your Name and Company as preferred in their appropriate text fields, and click on Next.
26. Check the Network Adapter and Sound, MIDI, or Video Capture Card options if preferred, and click on Next.
27. Under Windows Components, select Install the most common components (recommended) and click on Next.
28. Choose No, I do not want a startup disk, and click on Next.
29. Wait for Windows 95 to install and click on Finish and your system will restart.
30. After your system gets restarted, enter the Computer name and Workbook name and click on OK.
31. Complete the setup, and once the system gets restarted again, enter the User name, and click on OK.
Note: To confirm if Windows 95 is installed, right-click on My Computer and select Properties. Check for the system name under the General tab and click on OK.
How to Download Windows 95 ISO for VMware
If you want to use VMware as your virtual machine application, follow the steps to download and install Windows 95 on your PC:
1. Download VMware Pro on your system and also the Windows 95 ISO file.
2. Open VMware, click on New at the top, and then click on Custom (advanced), followed by OK.
3. Select the Hardware compatibility as 5.x.
4. Select I will install the operating system later and click on OK.
5. Click on Windows 95 in the Guest Operating System and click Next.
6. Enter the Virtual Machine Name and Location and click on OK.
7. Enter the number of processors as 1 and select the Memory Window size as 512 MB.
8. Select NAT and click on OK.
9. Click on BusLogic, click on Next, select IDE (recommended), and click on OK.
10. Click on Create a new virtual disk and click on OK.
11. Enter Maximum Disk Size as 20, select Store virtual disk as a single file, and click on Next.
12. Click on Customize Hardware to add the Windows 95 ISO file to the virtual machine
13. Now, download the disk, click on CD/DVD, and then click on Browse to open the file.
14. Click on the USB controller, click on Finish, and then on Finish again.
15. Click on Power on this virtual machine and reboot your system.
16. Execute the fdisk command at the bottom, and enter Y if the disk size is greater than 512 MB.
17. Press the Enter key on the Create DOS Partition or Logical DOS Drive, and again Enter on Create primary DOS partition.
18. Enter Y on the next screen, click on the downward arrow on two lines (red pause sign), and click on Restart guest.
Note: If you get the operating system lost error after restarting, press the Esc key.
19. Click on the CD ROM device, execute the format C: command, and then press Y.
20. Press the Enter key, and then execute the following commands one after another:
mkdir WIN95
copy R:\WIN95\*.* C:\WIN95.
execute C:\WIN95
21. Now, Microsoft ScanDisk will open. Click on Continue on the next window, then on Yes, followed by Next.
22. Select C:\WINDOWS and click on Next. Then select Typical and click on Next.
23. Enter the Product key, click on Next, and follow the on-screen instructions.
24. Click on Install the most common components, click on Next, and then finally on Finish after the copying is completed.
25. Disconnect the floppy device after it is identified and click on OK.
26. Now, close the virtual machine after you receive a Windows protection error.
27. Click on Edit virtual machine settings on the left panel, then on the Add button at the bottom, and select Floppy drive.
28. Click on the Finish button.
29. Download the patch ISO file and add it to the floppy drive (Use Floppy Image File> Browse> select Patcher.ima file).
30. Execute patch9x and press the Enter key
Note: If you want to patch Win95 for the latest CPUs, then choose 2, and press Y and Enter.
31. Enter the computer and workgroup name and click on Close.
32. Manage your settings prompted on the screen. Click on OK after the setup is complete.
33. Now, the system will restart. Once restarted, enter the User name and click on OK.
How to Enable Sound After Installing Windows 95
You need to follow the steps mentioned below to enable sound after installing Windows 95:
1. Go to the Start menu, search for the Control Panel, and open it.
2. Go to Device Manager and click on + sign on Sound, video, and game controllers.
3. Check your Sound card. if you see an exclamation mark then it has an issue.
4. Download the drivers from the manufacturer’s site and follow the instructions accordingly.
5. Now, adjust the sound settings from the taskbar.
How to Enable Networking After Installing Windows 95
Follow the steps mentioned below to enable networking after installing Windows 95:
1. In the Control Panel, double-click on the Network icon, and ensure TCP/IP protocol is installed.
If not, then click on Add > Protocol > Add TCP/IP.
2. Now, double-click on My Computer, go to Dial up networking, and enter the ISP’s number and other information.
3. Right-click on the Connections icon, click on Properties, and then in the Server Types tab, tick the checkbox for Enable software compression and TCP/IP boxes.
To sum up, experiencing the simplicity of computers from the bygone era is going to be worth it.
We hope this article helped you with how to install Windows 95 on a virtual machine.
Drop your queries and suggestions in the comments box below and keep visiting Learntohow.com for more detailed informative guides.

